
前言说明
这里先以博客的评论模板展开实战,基础班是最基本的实现了评论和回复评论功能,但是在UI展示方面,没有能实现树状的层级结构,而且是回复评论的记录都在对应的顶层评论之下进行缩进
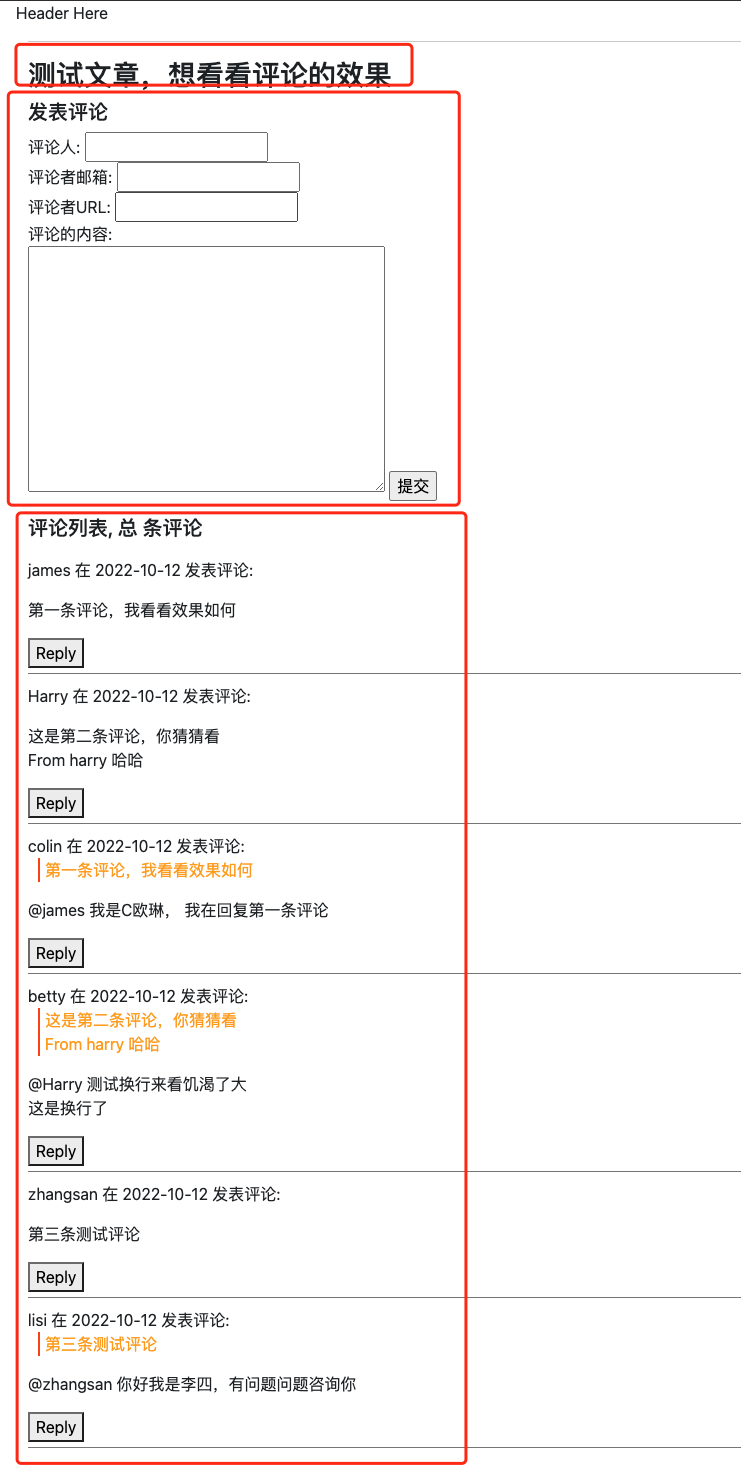
先看效果图
模型设计
这里因为是做Demo介绍,所以把文章和评论放到了一个应用中去,常规情况下为了应用的复用,建议是拆分成两个独立的应用
1、模型代码
1
2
3
4
5
6
7
8
9
10
11
12
13
14
15
16
17
18
19
20
21
22
23
24
|
class Post(models.Model):
"""
1、用于测试,不用给全所有属性
2、常规建议文章是独立的APP,评论是独立的APP,这里为了测试放到了一起
"""
title = models.CharField(max_length=128, verbose_name="文章标题")
def __str__(self):
return self.title
class Comment(models.Model):
post = models.ForeignKey(Post, on_delete=models.DO_NOTHING, verbose_name="评论的文章")
comment_body = models.TextField(verbose_name="评论的内容")
comment_time = models.DateTimeField(default=timezone.now, verbose_name="评论时间")
comment_user = models.CharField(max_length=32, verbose_name="评论人")
comment_email = models.EmailField(verbose_name="评论者邮箱")
comment_url = models.URLField(blank=True, null=True, verbose_name="评论者URL")
parent_comment = models.ForeignKey('self', null=True, on_delete=models.DO_NOTHING, verbose_name="回复的评论")
def __str__(self):
return f'{self.comment_user.username} 评论说: {{ self.comment_content[:20] }}'
|
视图设计
视图函数代码
1
2
3
4
5
6
7
8
9
10
11
12
13
14
15
16
17
18
19
20
21
22
23
24
25
26
27
28
29
30
31
32
33
34
35
36
|
def index(request):
posts = Post.objects.all()
context = { 'posts': posts }
return render(request,'comment/index.html',context=context)
def detail(request, id):
post = Post.objects.get(pk=id)
comments = Comment.objects.filter(post_id=id)
form = CommentForm()
context = { 'post': post, "comments": comments, "form": form}
return render(request,'comment/detail.html',context=context)
def comment(request):
comment_body = request.POST.get('comment_body')
post_id = request.POST.get('post_id')
pid = request.POST.get('pid')
username = request.POST.get('comment_user')
email = request.POST.get('comment_email')
url = request.POST.get('comment_url')
post = Post.objects.get(id=post_id)
new_comment = Comment()
new_comment.comment_body = comment_body
new_comment.comment_user = username
new_comment.comment_email = email
new_comment.comment_url = url
new_comment.post = post
if pid:
new_comment.parent_comment_id = pid
new_comment.save()
return HttpResponseRedirect(reverse("comment:detail", args=(post_id)))
|
因为是在学习Django,所以能用Django自带功能实现的,就优先使用Django功能
在template表单页展示时,可以自己写纯HTML页面,也可以使用 Django Form 表单来快速创建
Form表单代码
1
2
3
4
5
6
7
| from django.forms import ModelForm, Textarea
from comment.models import Comment
class CommentForm(ModelForm):
class Meta:
model = Comment
fields = ['comment_user', 'comment_email', 'comment_url', 'comment_body']
|
URL及Template模板
1、URL设计
1
2
3
4
5
6
7
8
9
10
|
from django.urls import path
from comment import views
app_name = 'comment'
urlpatterns = [
path('', views.index, name='index'),
path('post/<int:id>/', views.detail, name='detail'),
path('post/comment/', views.comment, name='comment'),
]
|
2、template模板,这里只有 index.html 和 detail.html
index.html是展示文章列表,为了友好的跳转到详情页去
detail.html 页面主要是演示 评论框、评论列表和回复功能, 因为文章只有title,所以重点在演示评论功能
1
2
3
4
5
6
7
8
9
10
11
12
13
14
15
16
17
18
19
20
21
22
23
24
25
26
27
28
29
30
31
32
33
34
35
36
37
38
39
40
41
42
43
44
45
46
47
48
49
50
51
52
53
54
55
56
57
58
59
60
61
62
63
64
65
66
67
68
69
70
71
72
73
74
75
76
77
78
79
80
81
82
83
84
85
86
87
88
89
90
91
92
93
94
95
96
97
98
99
100
101
102
|
<!DOCTYPE html>
<html lang="en">
<head>
<meta charset="UTF-8">
<meta http-equiv="X-UA-Compatible" content="IE=edge">
<meta name="viewport" content="width=device-width, initial-scale=1.0">
<link href="https://cdn.jsdelivr.net/npm/bootstrap@5.1.3/dist/css/bootstrap.min.css" rel="stylesheet" >
<link rel="stylesheet" href="https://cdn.jsdelivr.net/npm/bootstrap-icons@1.9.1/font/bootstrap-icons.css">
<script src="https://cdn.bootcdn.net/ajax/libs/jquery/3.6.0/jquery.js"></script>
<title>Document</title>
</head>
<body>
<div class="container">
<h5>发表评论</h5>
<div class="row" style="margin-bottom:15px;">
<form action="{% url 'comment:comment' %}" method="post">
{% csrf_token %}
<input type="text" name="post_id" value="{{ post.id }}" hidden>
<input type="text" name="pid" id="id_parent_comment" hidden>
<div class="col-md-4">
<label for="form.comment_user.id_for_label">{{ form.comment_user.label }}: </label>
{{ form.comment_user }}
{{ form.comment_user.errors }}
</div>
<div class="col-md-4">
<label for="form.comment_email.id_for_label">{{ form.comment_email.label }}: </label>
{{ form.comment_email }}
{{ form.comment_email.errors }}
</div>
<div class="col-md-4">
<label for="form.comment_url.id_for_label">{{ form.comment_url.label }}: </label>
{{ form.comment_url }}
{{ form.comment_url.errors }}
</div>
<div class="col-md-12">
<label for="form.comment_body.id_for_label">{{ form.comment_body.label }}: </label> <br>
{{ form.comment_body }}
{{ form.comment_body.errors }}
<input type="submit" value="提交">
</div>
</form>
</div>
<div class="row">
<h5>评论列表, 总 <span>{{ comment_count }}</span> 条评论</h5>
<ul class="comment-list list-unstyled">
{% for comment in comments %}
<li class="comment-item" style="margin-top: 10px ; padding-bottom: 5px; border-bottom: 1px solid gray;">
<div class="">
<p style="margin: 0px;">
<span>{{ comment.comment_user }} </span> 在 <span>{{ comment.comment_time |date:'Y-m-d'}}</span> 发表评论:
</p>
{% if comment.parent_comment_id %}
<div id="parent" style="color: orange; padding-left: 5px; margin-left: 10px; border-left: 2px solid orangered;">
{{ comment.parent_comment.comment_body|linebreaks}}
</div>
{% endif %}
<p><span>{{ comment.comment_body|linebreaks }}</span></p>
<button class="reply" username="{{ comment.comment_user }}" pk="{{ comment.pk }}">Reply</button>
</div>
</li>
{% empty %}
<p>暂无评论</p>
{% endfor %}
</ul>
</div>
</div>
<script src="https://cdn.jsdelivr.net/npm/bootstrap@5.1.3/dist/js/bootstrap.bundle.min.js"></script>
<script>
$(".reply").click(function() {
$("#id_comment_body").focus()
var val = "@" + $(this).attr("username") + ' '
$("#id_comment_body").val(val)
var pid = $(this).attr("pk")
console.log(pid)
var var_pid = document.getElementById("id_parent_comment")
var_pid.value = pid
})
</script>
</body>
</html>
|
这里有一小段js代码,需要在文件head中引入 jquery ,目的有:
1、在点击Reply/回复 的时候聚焦到 评论框,同时这里还给回复的时候添加了默认的内容 @xxx
2、同时设置回复的内容的ID,也就是当前评论的父级评论的ID,为了是为了知道 回复的那条评论
知识点总结
1、引入了Django Form 表单,单独的Python文件定义,然后可以在template中快速创建响应的表单
2、一小段JS代码,实现回复时自动聚焦到评论框和设置父级评论的ID
3、在template中的模板表单 等post提交数据的地方,需要添加{% csrf_token %} 不然会报错,当然可以通过在post对应的待处理的视图函数上添加@csrf_exempt装饰器(忽略csrf校验) 对应的有个 csrf_protect 开启csrf校验
4、在comment视图函数中,注意需要判断父级评论id是否为空,来设定当前是回复的评论还是一般评论 ;同时注意评论成功之后进行跳转到当前详情页,查看当然评论的内容
问题和思考
从最开始的图片可以看到,虽然模型定义是符合树状结构 的,但是实际页面展示的时候却没有按照树状结构进行层级缩进 展示
因为在多层级的情况下,需要判断是不是叶子节点,而且还要用到递归处理。 写个递归很简单,但是又涉及到在template模板中进行数据展示,常规的函数无法使用,需要编写 标签或者过滤器才可以
那除了自己开发之外, 有没有更好的方案呢?
当然有,现在常用的是 django-mptt 第三包,另外一篇文章我们单独讲解 django-mptt
代码开源地址:https://gitee.com/colin5063/django_learning_v2/tree/django_blog_comment_v1/
如果觉得文章对你有用,请不吝点赞和关注公众号搜索 全栈运维 或者 DailyJobOps
个人博客 http://blog.colinspace.com/
知乎平台 https://www.zhihu.com/people/colin-31-49
CSDN平台 https://blog.csdn.net/eagle5063
简书平台 https://www.jianshu.com/u/6d793fbacc88